
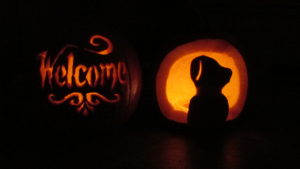
The difference between tracing (left) and winging it (right) is drastic, but both have their benefits
When you’re growing up, there’s no better joy than getting a pumpkin at the pumpkin patch and carving it into whatever you want.
When you get older, you outgrow all of the Halloween traditions and change them to fit your adult lifestyle. Trick-or-treating becomes bar hopping, costumes become more scandalous or nonexistent and pumpkin patch trips become either haunted houses or sitting at home enjoying a terrifyingly scary movie.
Pumpkin carving is something that people sometimes outgrow, but there’s always a way to improve and continue the tradition as an adult.
As a kid, you either need help with come of the knife techniques or figuring out how to carve a pumpkin, depending on your age. Now, as an adult, you know how to carve and be more creative than the simple two eyes, a nose and a creepy mouth.
There are many options to pumpkin carving, and now you can use photos you’ve seen online as inspiration.
There are two options for pumpkin carving. One: wing it and do your own thing, or two: trace an outline from any other pumpkin carving design you can find.
Tracing the outline will make your pumpkin look better than any other pumpkin, but making your own pumpkin carving design is more creative, so choose whichever you prefer.
Since there are already steps for the pumpkin carving kits, these are the steps for your pumpkin to turn out the best it can when winging it:
- Carve out the stem. Going at an angle with a large sharp knife, cut around the stem and then take it out. Then cut around inside so your hand can fit to scrape out the pumpkin innards.
- Once the walls sound hollow and feel like all the pumpkin guts are out, begin the carving process.
- Before carving the pumpkin, decide which side of the pumpkin is the best side for a “face.” This will be the side that is larger, has no bumps and seems like it gives you more surface area.
- What should you carve? Think about whether you want it to be scary, cute or a pumpkin with words. Use resources online and in the carving book for inspiration.
- Once you know what you want to carve, take a pen and draw out the outline of the design.
- For the actual carving, use the carving knife. Remember how bad they use to be, always bending in half. Well, now they seem sturdier, so try it out. It also keeps you from making more mistakes than you would with an actual knife. Now start from the bottom up. Try to keep a hand inside the pumpkin to keep it sturdy and avoid things popping out of place. If there are any areas you are unsure around sizing, make it bigger rather than smaller because you can always trim up those places toward the end of the process.
-
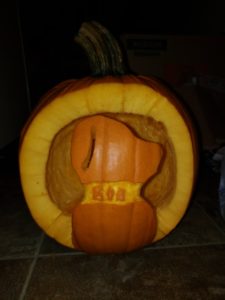
Miranda Stambler| THE SPECTRUM
Shaving off some of the pumpkin skin can give it more affect during the day.To change it up, you can also shave certain parts of the pumpkin so they are lighter and give more contrast to the pumpkin. To have this part show up at night when it is lit, shave the inside more around that area, or if this is too risky and you are afraid of breaking your piece, leave it for the people who get to see it in the daylight.
Tip: if something that is supposed to be a part of the carving is accidentally cut out, take a toothpick and stick it back into place. If there is a giant area that is supposed to be open to create a silhouette, cut it into sections so the silhouette does not break out of the pumpkin and ruin the whole piece.
- Once you have carved every piece, go around and trim up any areas that need work.
- Take out any extra pieces of the pumpkin that fell inside.
- Place a candle on the inside (real or fake), and take a picture to add to your festive social media.